Crochet for absolute beginners Part 2: Crocheting in a straight line

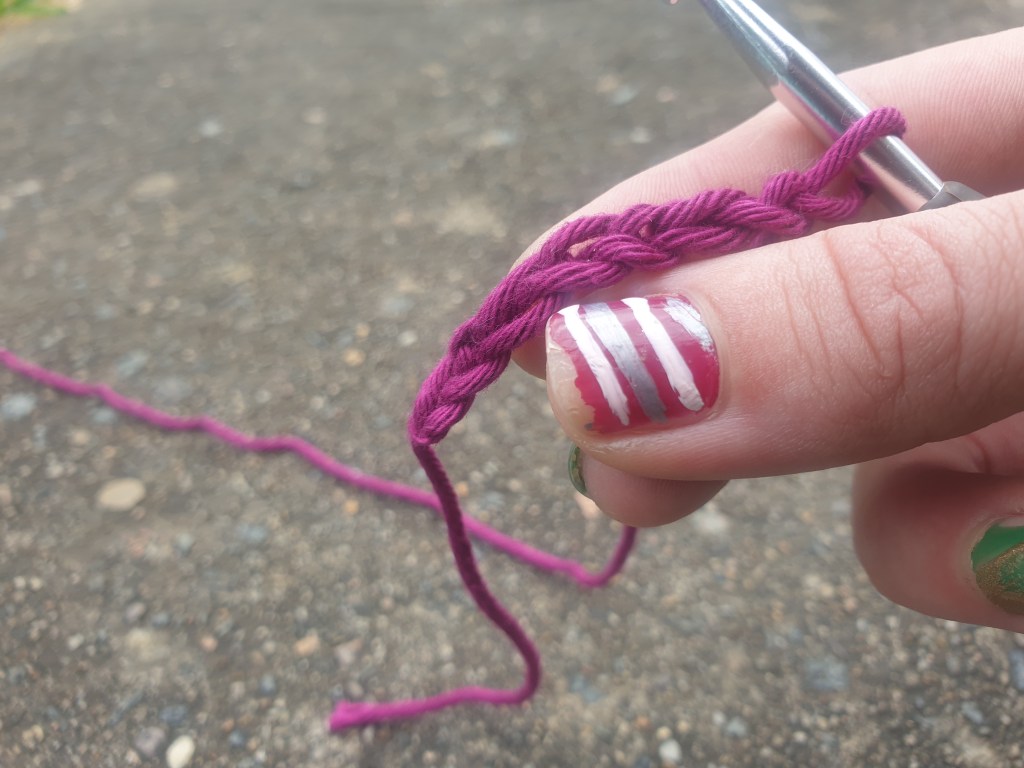
Welcome back for part 2 of crochet for absolute beginners. The video version of this tutorial is at my YouTube channel. I’ll be using US terminology in the main text. In brackets I will place the equivalent UK stitch translation next to each US stitch. In the previous part we made a foundation chain. You’re going to use that foundation chain now so have it ready.

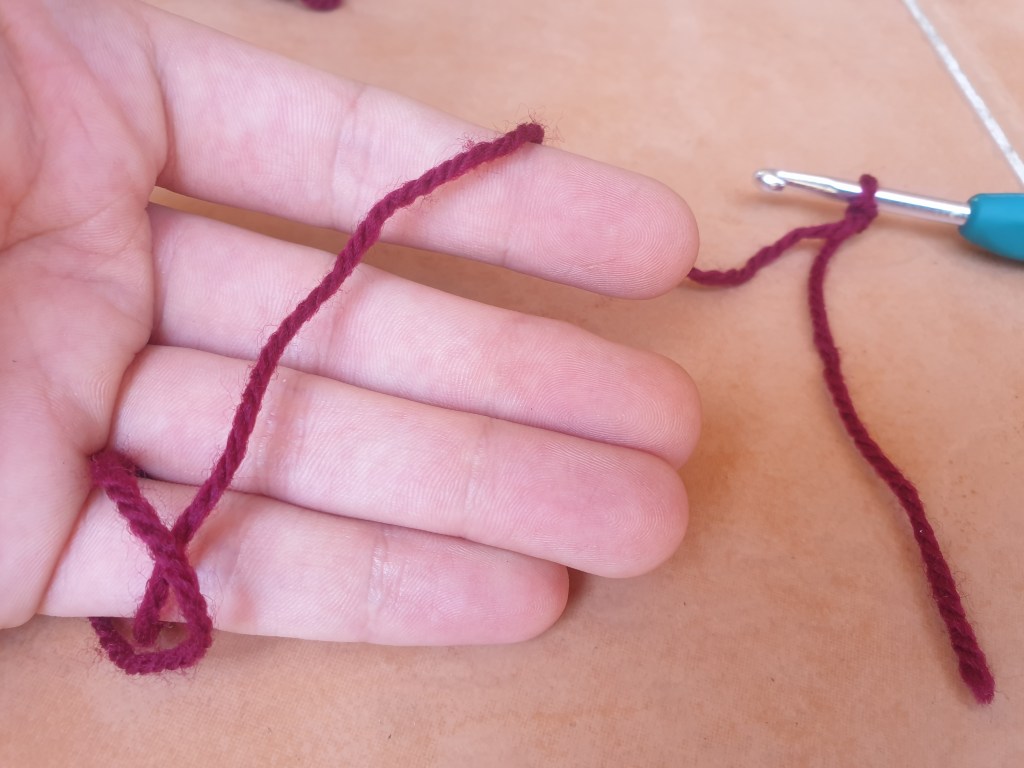
There are multiple parts of the chain you can work into to get a different effect along the beginning edge of your work. First we will identify the parts of the chain so that we know which part to use.

From the top view of the foundation chain you will see V-shaped stitches linked together. Each of the 2 strands of the v is a single chain stitch. Normally you will work into either 1 or both of these strands. I prefer to work along the top strand of the v.

Foundation chain top view. Find the V-shaped stitches. Excuse me for the chipped polish!
Foundation chain bottom view. Find the back bumps of each chain stitch.

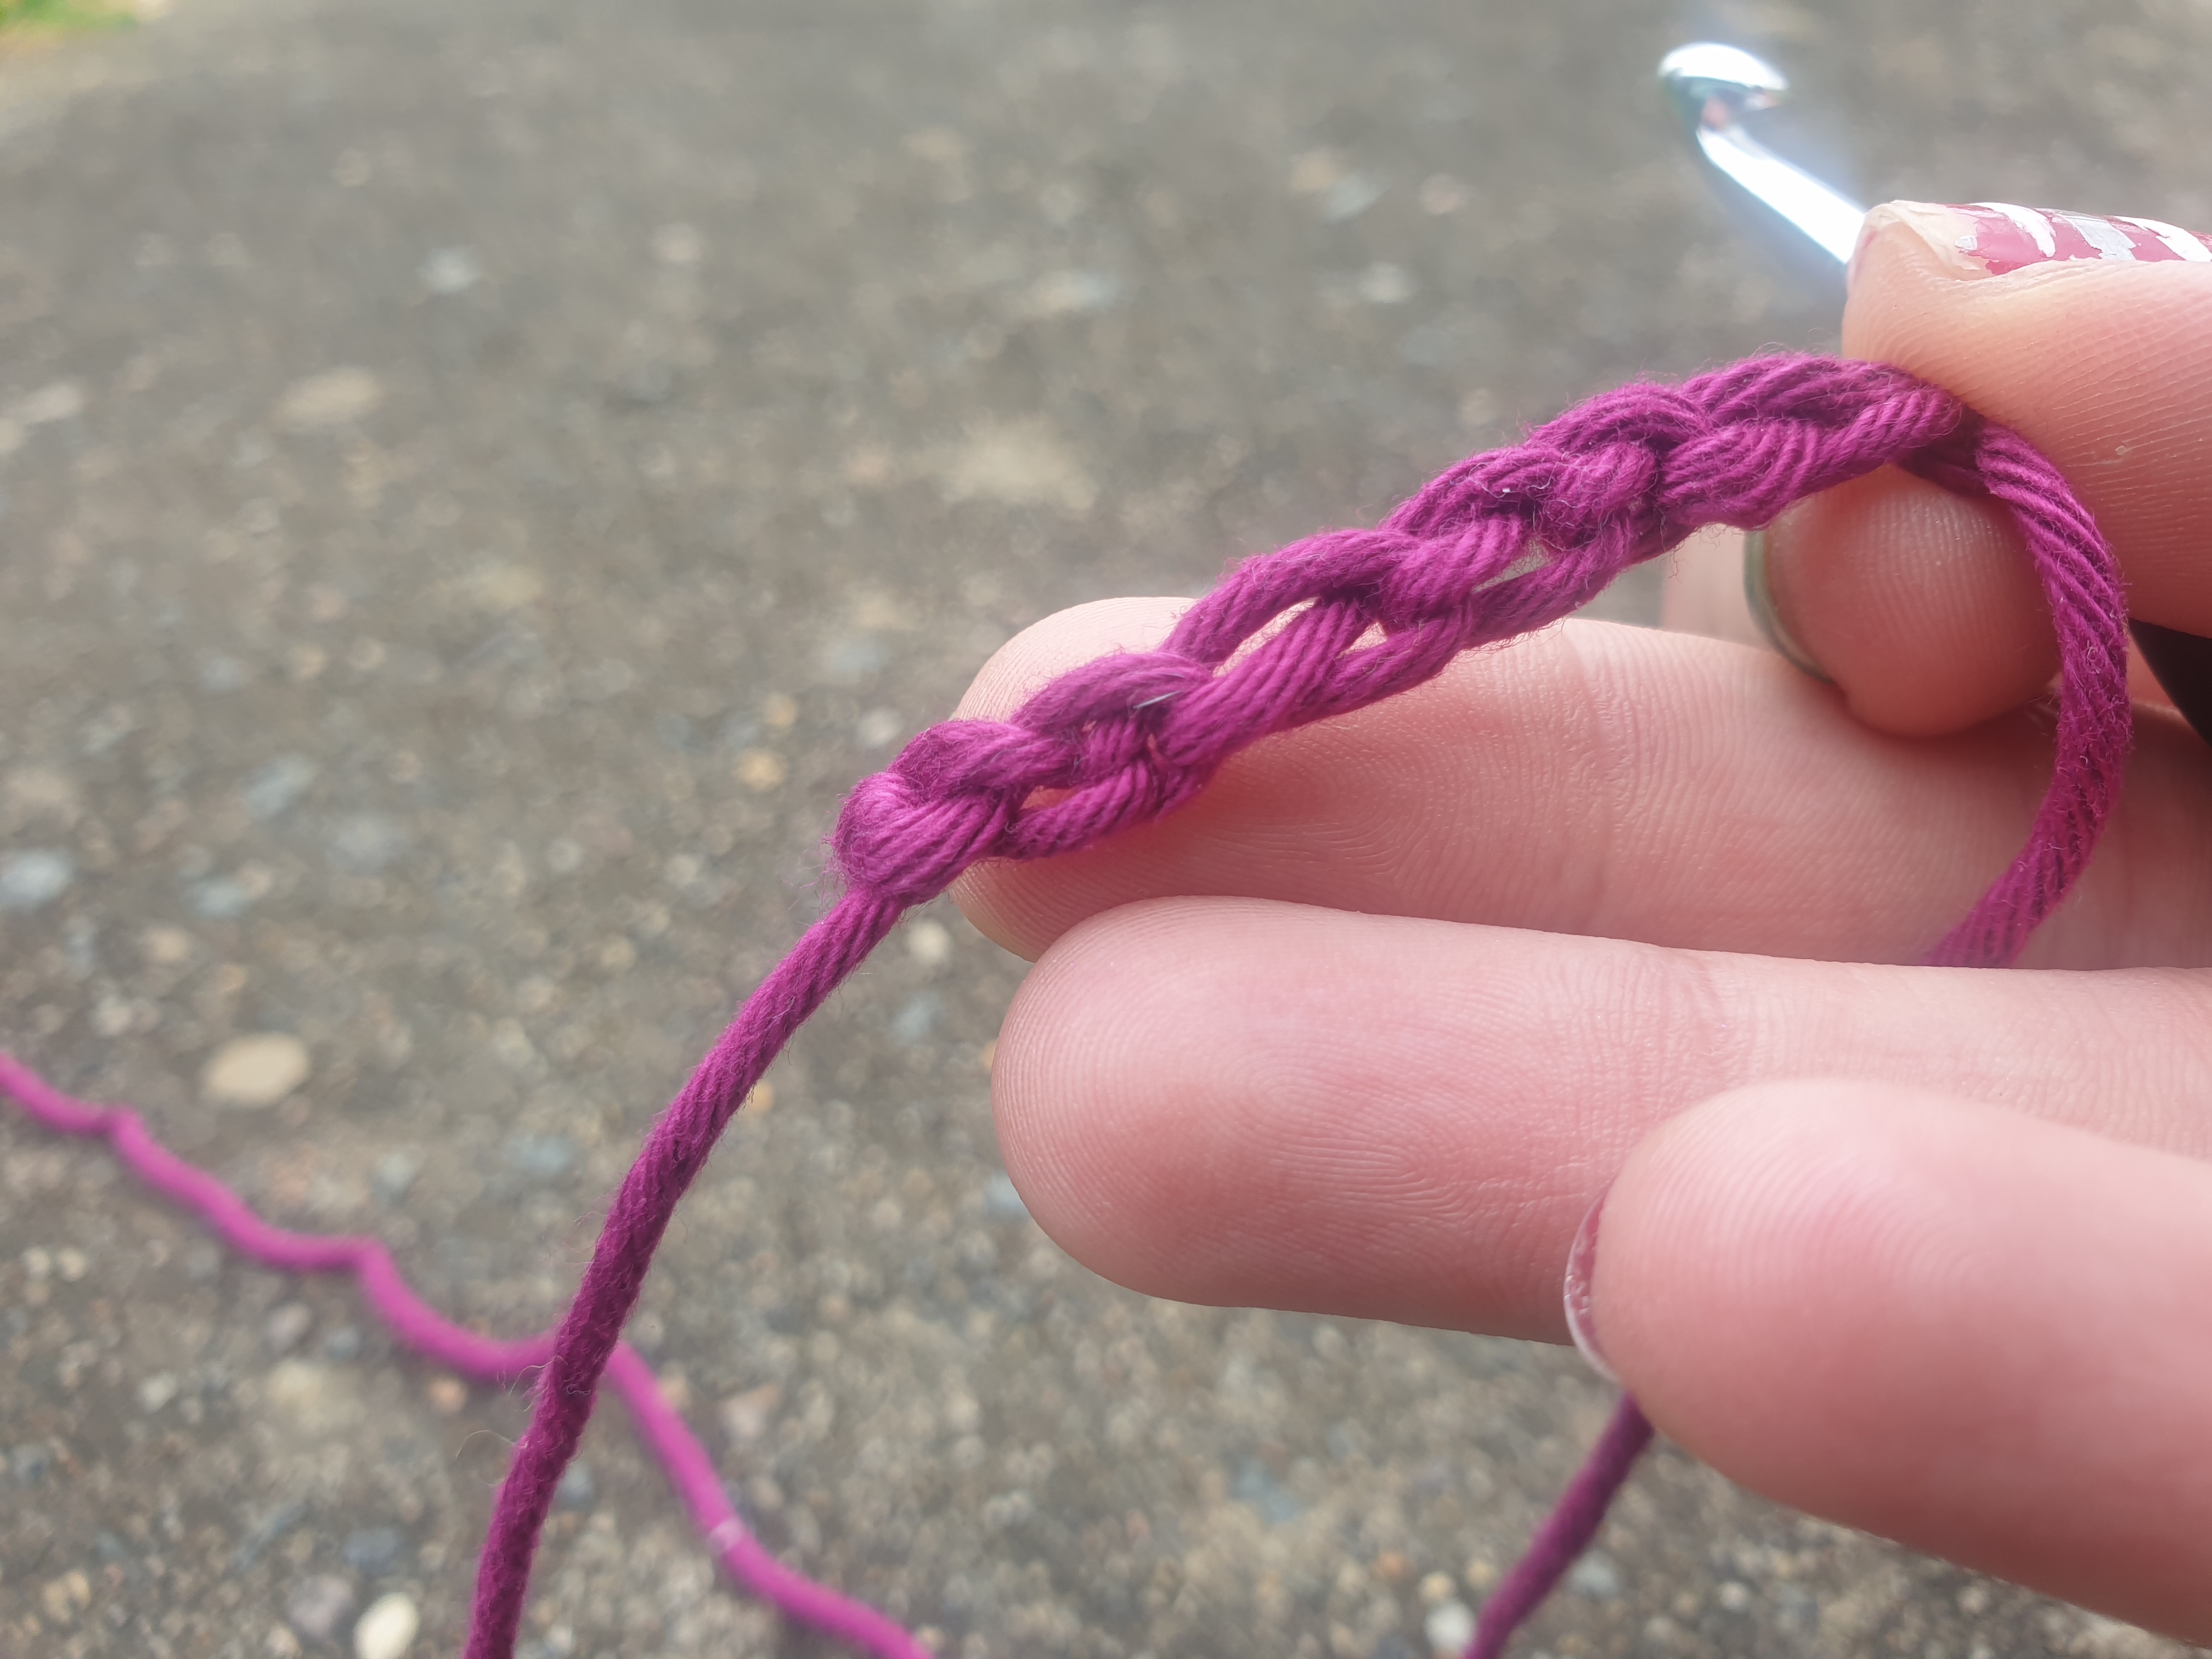
When viewing the base of those v-shaped stitches you’ll see a 3rd strand behind the 2 v strands. I call this the back bump of the chain. Sometimes it’s pulled a bit tight to see it but once you get an eye for it you will spot them in no time. It will take a bit of practice and playing around with the yarn before you can easily tell which strand is which. Don’t give up too early! Practise, practise, practise.

Depending on which type of stitch you will use along the chain there will be a particular number of “turning chains” you will need. This is because the height of each stitch is different. One single crochet stitch (double crochet in UK terms) is the height of one chain stitch so you will leave one “turning chain” on your foundation chain and between each row. A half double crochet (half treble crochet in UK) stitch is as tall as 2 chains so you will leave 2 chain stitches before working into the 3rd chain from the hook. Remember, the loop on the hook isn’t a stitch yet so it doesn’t count.

Working a single crochet (double crochet in UK) into the 2nd chain on the hook. Also working into the top loop of the foundation chain.

My preference is to work into the top loop of the foundation chain as this is easiest for me. Here’s a row of single crochet or sc (dc in the UK) worked into the top loop of a foundation chain, see next image below.

Single crochet (double crochet in UK) worked into the top loop of the foundation chain.

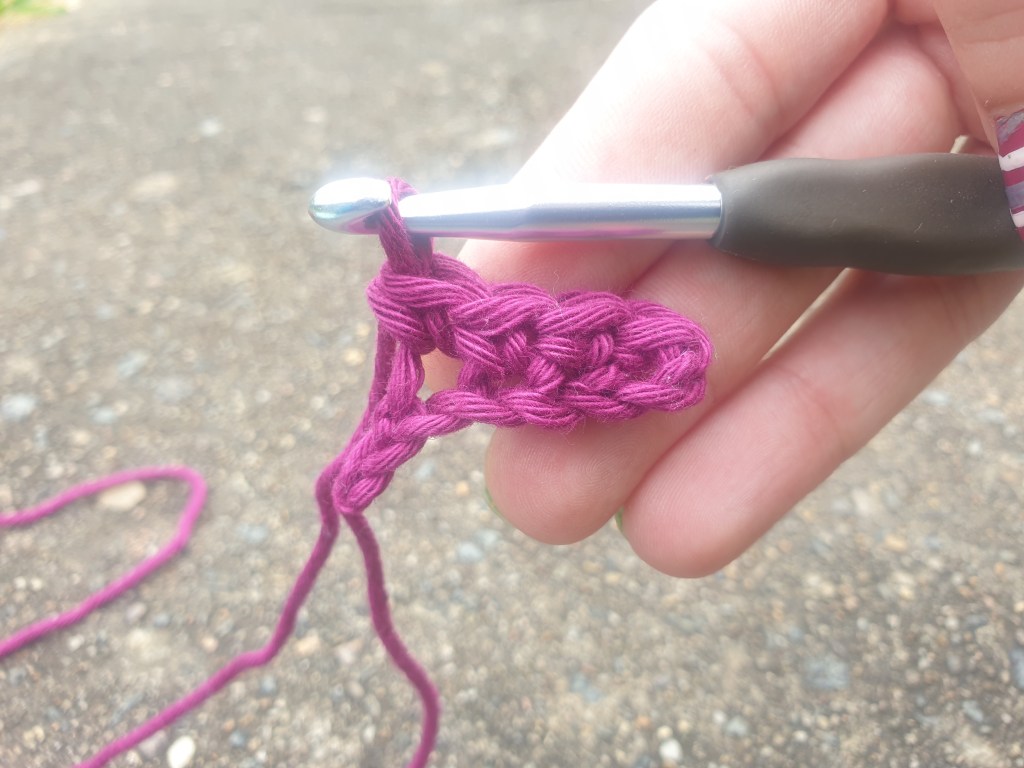
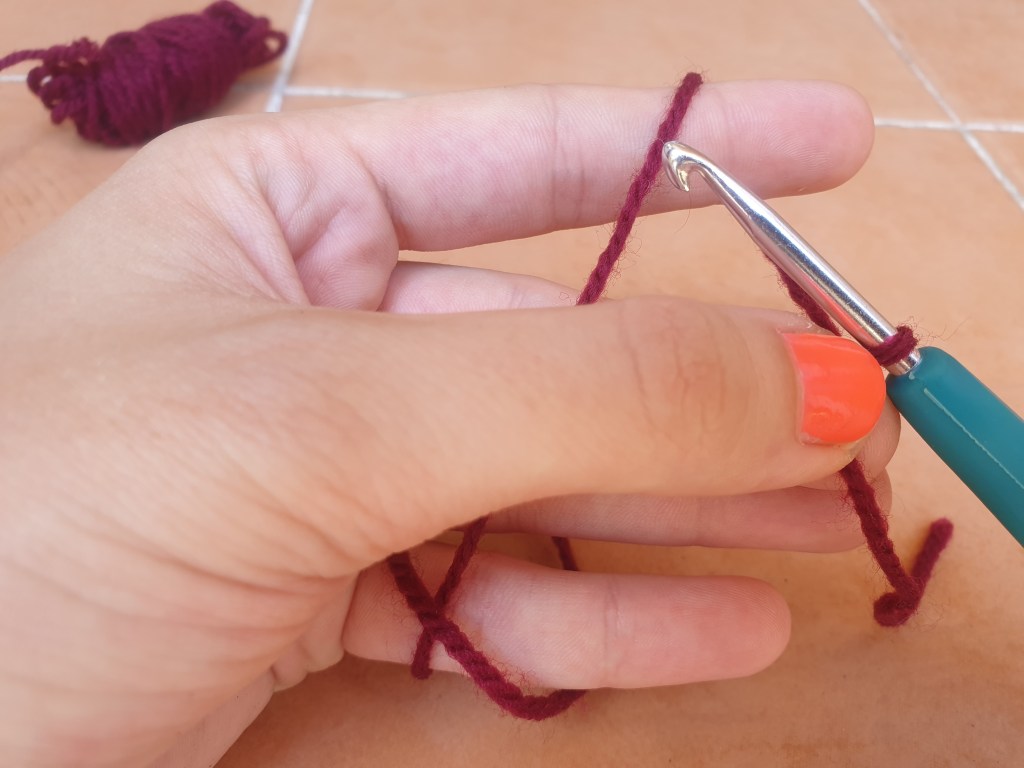
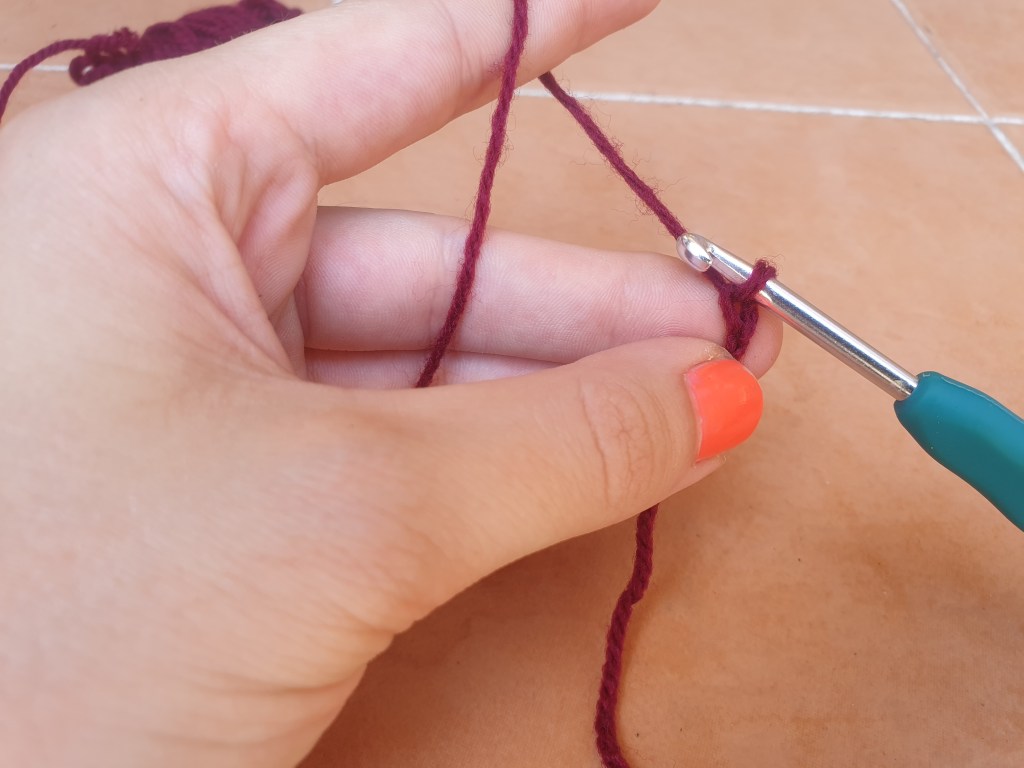
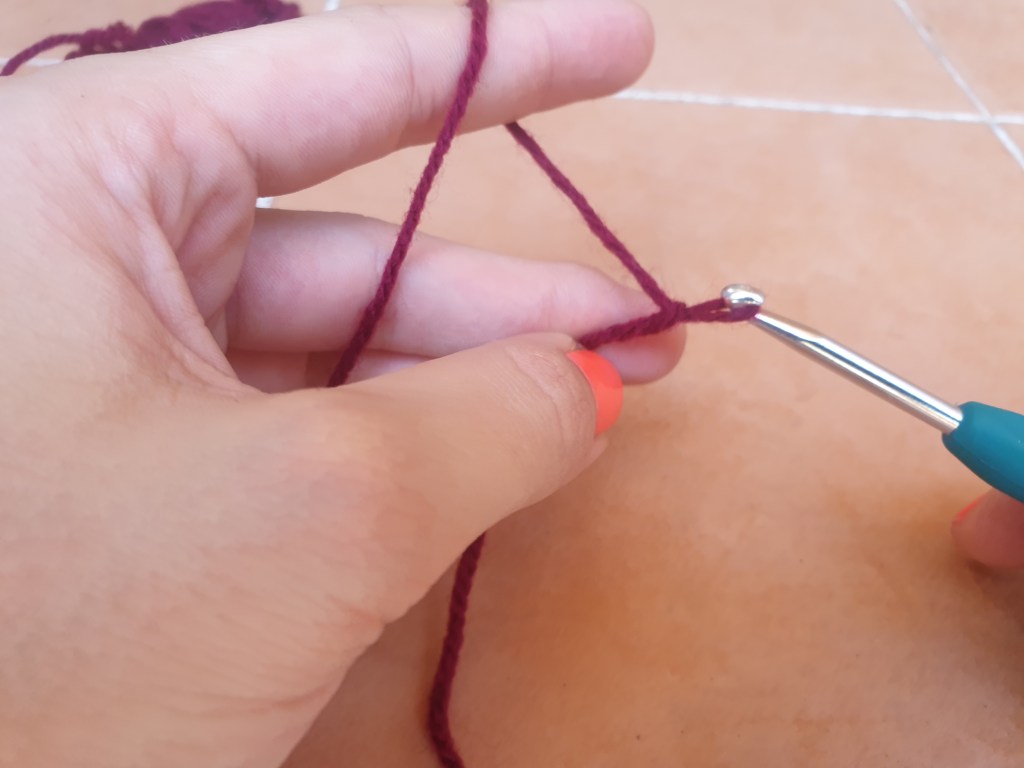
To make the sc (dc) stitch you begin by inserting the hook into the second chain on your hook. The loop on the hook doesn’t count as a stitch so don’t count from this loop. Next you “yarn round hook” (as shown in my YouTube videos part 1 and 2). Then pull that yarn through the first loop on the hook which is called “pulling up a loop”. Now you have 2 loops on your hook so next you “yarn round hook” and then pull the yarn through both loops. You’ve completed one sc. Well done!

Now what about crocheting into other parts of the chain? As I mentioned above, working into the back bump is more difficult but it’ll give an edge that has the V-shaped chain stitches pointing out. This technique makes a nice looking detail for crocheting straps and hems.

Working a sc (dc) into the back bump of the foundation chain.

In the next photo you’ll see a row of single crochet (dc) worked into the back bump of the foundation chain.

Row of sc (dc) worked into the back bump of the foundation chain stitches.

My personal favourite stitch is the half double crochet or hdc (half treble crochet or htr in the UK) because it works up so quickly and it looks like pretty little knots all in rows. The height of this stitch is between a sc (dc) and a dc (tr). You’ll need 2 turning chains to make a hdc (htr) so count 2 chains after the loop on the hook. Work into the 3rd chain from the hook.

Half double crochet (half treble crochet) stitches worked into the top loop of the foundation chain.

To make a hdc (htr) you need to “yarn round hook” before you place your hook in the stitch. Now the yarn is wrapped around the hook once, place the hook in the next stitch and yarn round hook. Now you pull up a loop through the first loop on the hook. You will have 3 loops sitting on the hook. Now yarn round hook and pull through all 3 loops. That’s one hdc (htr) complete. Excellent!

A double crochet (treble crochet) stitch needs 3 turning chains as well because it is about as tall as 3 chains. When making a new row with dc (tr) stitches you’ll make 3 chain stitches at the end of the row then turn your work and continue into the first stitch of the new row.

Double crochet (treble in the UK) stitches worked into the top loop of the foundation chain.

Before you put the hook into your work wrap the yarn around the hook once then go and put the hook into the next stitch. Yarn round hook, pull up a loop through the first loop on the hook. You have 3 loops on the hook. Yarn round hook, pull yarn through the first 2 loops on the hook. You have 2 loops left on the hook. Yarn round hook, pull the yarn through both loops. That’s the double crochet (treble crochet).

Treble crochet (known as double treble crochet in the UK) needs 4 turning chains and it is taller than a dc. You normally won’t encounter stitches taller than the tr (dtr) in the majority of the patterns you will see. So I’ll end with a picture of tr (dtr) stitches worked into a foundation chain.

Treble crochet (double treble in the UK) stitches worked into the top loop of the foundation chain.

For the tr (dtr) stitch you leave 4 chains then crochet into the 5th chain from the hook. Or if you’re at the start of a new row you will make 4 chains before working into the row. But before you go ahead and put the hook in the stitch you need to give the stitch height. More height than the previous double crochet (treble crochet) stitch.

Wrap the yarn around the hook twice and then insert the hook into the next stitch. Yarn round hook again and pull up a loop through the first loop on the hook. Now you have 4 loops on the hook. Yarn round hook and pull up a loop through the first 2 loops on the hook. Now you have 3 loops on the hook. Repeat the yarn round hook and pull up a loop through the first 2 loops on the hook. Now you have 2 loops left on the hook. Time to finish the stitch! Yarn round hook, pull through both loops and you’re done.

Thanks again for joining me as we become more confident and competent with various crochet techniques. Please like and subscribe to my YouTube channel too!

Just a reminder, you can see the video version of this blog post here.

Crochet for absolute beginners Part 1: how to begin a foundation chain

There’s a new video on my YouTube channel showing how to begin a foundation chain. I’m a left hander but I learned to crochet right handed so all of these tutorials are right handed. I tried to provide enough background information so that you not only can begin a crochet project but you can understand what you’re doing as you learn. I was disheartened by a lot of tutorials that relied on a lot of assumed knowledge in their videos. As an absolute beginner I was so lost and I quickly gave up relying on video tutorials. I had to first study the basics before watching seasoned crocheters try to remember what it’s like to be a beginner.

My first video was a bit dodgy because I’m nervous. I keep doing that thing where my mind tells me I’m doing everything wrong and I psyche myself out. I’ll try to film the second video today. Until then, here’s the link to the first video: https://youtu.be/58f4hh0LGMw

The basics

1. Make a slip knot

The easiest way to do it is with your crochet hook in your hand. Wrap the yarn around your fingers and pull the yarn from the ball through the loop you made around your fingers.

2. Holding the yarn

Keeping the tension is important if you want even sized stitches. Wrap the yarn around your pinky and then around your forefinger of the non dominant hand.

Wrap the yarn around your fingers to keep an even tension

Using your thumb and middle finger hold your work close to the hook to keep it steady.

Hold your work close to the hook

3. Yarn round hook

Wrapping the yarn around the hook in a consistent direction will produce consistent stitches. Unless otherwise stated in the pattern the yarn will always go behind the hook then wrap around and you pull it through the loop.

The yarn begins behind the hook…
…and wraps around so you can pull up a loop.

4. Pull up a loop

Pull the yarn through the loop on the hook.

One chain stitch is done.

One complete chain stitch.

5. Identifying parts of the chain.

Find the v-shaped stitches. Each v is a chain stitch as viewed from the top. There are 3 parts to a chain stitch and you can use the different parts to create certain edges at the beginning of the work. Just remember to always crochet into the same part of the chain stitch the entire way through otherwise the chain will end up bumpy and uneven. Also remember the loop on the hook isn’t a stitch yet. Your chains are the stitches next to that loop on the hook.

3 chain stitches and a slip knot that has been pulled tight.

Note that the initial slip knot does not count as a stitch in crochet. Pull this knot tight and don’t work into it. (This can get confusing for knitters as knitted work always uses the slip knot as a stitch!)

Thanks so much for reading, as always. I’ll be uploading the next video tonight so you can learn how to crochet into a row. Pretty please like this and subscribe to my YouTube channel queeenvk (with 3 e’s.)

Synthetic clothes: the hidden polluter

I am absolutely heartbroken. If you’ve ever had a glance at my Instagram (@queeenvk with 3 e’s, don’t ask) you’ll know I am a fan and collector of Black Milk Clothing. Unfortunately almost every item they have is made from synthetic fibres. Synthetic fibres are polymers created by a chemical process and these polymers form plastics that are impossible to break down in a safe and toxic-free way.

Every year Black Milk releases a Halloween collection and unfortunately I couldn’t stop myself from purchasing a dress made of synthetic fibres because I was so excited about the pattern. The fabric is called burned velvet and I adore the feel of soft fluffy fabrics. Anyway, it breaks my heart that all of that synthetic velvet will create a lot of plastic microfibres purely through dust and shedding alone. Washing it in a washing machine would flush tens of thousands of microplastics down the drain. I decided to carefully hand wash the dress in the laundry sink with my soapberries and let it soak for only 45 minutes. When I came back I saw islands of floating microplastics across the top of the water. Unfortunately I didn’t have my phone with me so I didn’t take a photo. Here’s a picture of the soapberries for your interest.

Soapberries

I tried to filter off the plastic fluff and discard as much as I could but it was futile. Any fluff and dust produced by these clothes pollutes our environment. Last year I found out that 80% of the rubbish that we don’t put into the bin ends up in our waterways. All of that dust can end up in the ocean no matter what we try to do with it.

The Venus flytrap print on my new velvet dress from Black Milk Clothing

For now we will have to boycott purchasing any plastic clothing and fibres. But then what about socks?! Socks without some elastic fibre blend will fail to hold their shape. Wool socks aren’t an option because using animal products is so unethical. I’ve been boycotting purchasing animal products since I watched Dominion on YouTube. It’s a fascinating documentary, give it a watch! Although after watching it I’ve realised how difficult it is to live ethically in our current society. I just want to have stretchy fabric and wool, but it’s not that simple after all.

Sorry to be such a downer in this post! I just had to share this emotion with you all. Please share in the comments your feelings of how the textile industry is contributing to the pollution problem. Or any thoughts you’d like to put out there. Thanks so much for reading.

Crafternoon crochet

Crochet has always intrigued me. People can be so creative with all those knots and loops of yarn. I wanted to learn the skill of creating things with yarn too so at the end of 2018 I watched a YouTube video. Just any beginner How To video that came up.

The problem with learning from a video is that there was no one to correct my technique if it was wrong, or to answer any questions I had about finding the next stitch or where in the stitch to crochet into. So I got frustrated and gave up for the time being.

Next I asked a family member to help me learn to crochet. We began with the foundation chain. Well, that confused me a lot because I couldn’t understand why we were starting with this straight line of chains. I guess I wasn’t asking the right questions at the time!

I walked away a bit frustrated and confused. Now, this is usual for me when trying to learn a new skill. I get discouraged and stop trying for a bit. Then I pick it up again and eventually get the gist after looking at more resources and/or actually just practicing.

I turned to the pages of the crochet magazines I had excitedly bought from the local newsagent. There in the back of each mag is a How-to section for beginners. I also read some crochet blogs and tips online. Eventually I did get the gist…

In 2019 I was diagnosed with Autism Spectrum Disorder without intellectual disability, which used to be known as Aspergers Syndrome. Now that I know I’m on the spectrum I understand why crochet and knitting is so soothing, the repetitive movements.

You may know that people with ASD will sometimes “stim” which can involve repeating a motion over and over. It’s a fantastic distraction for the mind and a very peaceful way to pass the time.

Crafternoon

When you get home from work do you go on autopilot and turn on the TV or Netflix? I replaced my TV viewing afternoons with craft like crochet and knitting. You could say it’s a crafternoon.

Some crochet patterns involve counting and concentration which makes it very difficult to pay attention to the plot of a show. I find that a podcast or music without words are a good background for crafternoons. Or even just the sounds of the neighborhood around me, particularly when beginning a long foundation chain and I need to focus on counting!

Don’t get me wrong, I still watch TV shows and movies, just a lot less these days. I’m still a beginner so I look at my work a lot. Once you become autonomous with a skill you can go by muscle memory, but I still need to find which is the next stitch to crochet into!

Plastic free materials

I’ve been sourcing yarn for my crochet and knitting that is plastic free. Think about all of the microplastics created from the fluff of synthetic materials. When I found out that every time I wash my synthetic clothing I release up to around a million particles of plastic into the ocean I freaked. Have a look at this article about it if you’re interested: The contribution of washing processes of synthetic clothes to microplastic pollution

I feel a lot of empathy, I always have, so the thought of destroying the wildlife with the choices I make in my day to day life hurts. But also… Think of all the plastic filling the stomachs of all the seafood you’re eating…

You can reduce the plastic fibres going down the drain by capturing them in a bag such as the Guppy bag. That’s the one I use. It’s like a giant delicates bag for my Black Milk Clothing collection. Hehehe..

At the end of 2019 I began my vegan journey. I have changed my purchasing habits to avoid animal products and other unethical products.

Did you know that material made from bamboo is made with harsh chemicals that affect the workers using them and the environment. How Viscose Rayon Fabric Masquerades as Bamboo Clothing

Before last Christmas I found a beautiful scrubbie yarn in 100% cotton. It makes great body scrubbers so I made a bunch for my family and gave them as gifts at Christmas. I hope the cotton scrubbies replace the plastic loofah in their shower. The recommendation is to replace your plastic shower loofah every 3 weeks. That’s a lot of plastic! I recently switched to a linen scrubber I found online so I just use my cotton scrubbie for travelling.

It’s not absolute perfection but it does the job!

Last week I found, at the bottom of my yarn stash, another ball of the scrubbie yarn! I can’t find it online anymore, I can’t remember what it was called. 😫

Anyway, I started making more body scrubbies and created an online store to sell them. Click the button below to visit the store. ⬇️

I also started making amigurumi for adults. (Amigurumi is crocheted toys) I found a free pattern on a blog with the best name ever, I wish I thought of it. I present the link to the Mr Hanky crochet pattern on the blog named…

Inside Uranus

Amazing. Bravo. I love it.

I’ve got one complete Mr Hanky item for sale on the Storenvy site but I can whip up another in a few days. I’m also thinking of scaling it up to make a bigger novelty toy.

The other adult themed amigurumi I’ve made have sold faster than I’ve been making them, so they aren’t listed on my store. See some pics below..

Some real beginner work

I hope you enjoyed reading about my journey. Please let me know if you want me to attempt to make you a custom item. I’m getting the hang of freestyling the shapes and patterns, I think!

Email me: fullcupwellness1@gmail.com

Update: I found an old photo of the scrubbie yarn I used! The dark yarn in the background is the navy blue shade of the same scrubbie yarn.

Your phone camera may be lying to you

I recently upgraded my phone to a Samsung Note 9 and it wasn’t until a few months later that I noticed the function of a particular setting that is default on. In the Settings menu this particular setting says that it corrects the shape of faces that appear distorted. I wasn’t exactly sure what that meant but I guessed it would help me take better photos.

So I was taking some selfies, trying to figure out my best angles to show off some cute new earrings when I noticed that the default camera app on my Samsung had distorted my face on purpose. Then I understood what the setting meant and it kind of broke my heart.

I love you Samsung. Why would you purposely distort my oval shaped face into a heart shaped face? Are you saying that my natural normal appearance, the features I have written in my DNA, are distorted?

DISTORTED.

In a time of low self esteem this is not appropriate. People are getting plastic surgery to look more like these camera filters. All humans have the choice to live their life however they wish, with or without body modification. But when we’re constantly shown fake images of what people are supposed to look like then we begin to feel that we don’t measure up to this impossible standard and it leads to mental illness. I struggled for many years before I gradually taught myself to have self esteem and if I’m being completely honest, it is the absolute best thing to do for yourself if you struggle with lack of self worth and self confidence. Future-you will thank you for it, trust me. Once you are no longer preoccupied with your perceived faults (Hint: they don’t exist) life is easier in every aspect. Bonus: Once people see the confidence you have in yourself they will have confidence in you too. It’s science. The branch of science is psychology.

Your physical appearance is irrelevant

Another setting on my Samsung that I turned off as soon as I could find it: the beauty filter. All it does is blurs the image so that you can’t see my pores and wrinkles and it seems to add extra dark pixels to my eyes and eyelashes to make them pop. If you’ve noticed any changes your particular camera app makes to your face, regardless of whether you prefer the setting on or off, write it in the comments below.

I turn these filters off because I know my face is acceptable as it is. I choose not to wear makeup most days because I know my face is great purely because it’s attached to me. I enjoy applying makeup when I feel like it because it’s fun, like an art project or special effects/cosplay.

Your physical appearance is irrelevant. Remember that. To me, I have absolutely no reason to judge your character based on a couple of features. Most of the time I don’t even notice appearance and it is extremely difficult for me to describe a person if they aren’t in front of me. It’s because I’m too busy focusing on your personality and that’s all I need to see. That’s the part that matters.

You are beautiful because of who you are and who you choose to be. Your appearance is irrelevant to me. Now go out there and get that self confidence.

You got this.

PS. I ended up taking the photos of my cute earrings with the camera filters off and a makeup free face. The only “flaw” I did notice is that I poke my tongue out a lot.

Featured image credit: https://kamdora.com/2014/07/16/how-to-tell-the-shape-of-your-face/

Resolutions that won’t fail

Resolutions and goals can be made on any day of the year, but this time of year is particularly motivating. If you’re making resolutions for the new year make them worthwhile. When making your resolutions here are some tips for success:
Clearly define each goal

The clearer your goals are, the clearer your path will be to reach them. If your goals are too nebulous you’ll struggle to pinpoint what you need to do to achieve them. Each step towards your goal should have a purpose, otherwise you’ve gone off track.

Break large goals down into smaller parts

A goal such as “Become a millionaire” is less attainable and can become discouraging when you don’t see a result. Define the smaller steps within your goal. Your goal to becoming a millionaire can have many different steps such as; create my online store, learn marketing techniques, expand my network of clients.

You have the resources available to reach your goal, you can literally do anything you want to achieve. There’s no need to feel discouraged as there is always more than one path to reach a goal, if the first way doesn’t work then try another path.
Remember, if your mental health is a roadblock in your path towards your goals you can make an appointment with a medical professional. Every aspect of your health, including mental health, can be addressed if you wish to improve it. There are a multitude of resources available to us, your GP is available to help you find the right resource for you.

Toothpaste + science = healthy mouth

I’ve recently heard that some people refer to AP-24 Whitening Toothpaste as “magic toothpaste.” The truth, however, is it isn’t magic at all… it’s science.

Did you know that your tooth’s enamel is porous which means it has tiny microscopic holes in it? When you drink dark liquids like wine or coffee and when you eat food, it can nestle into these little pores. When you brush regularly, the fluoride gets rid of plaque, but the stains remain. This is where this whitening toothpaste comes in handy.

In addition to fluoride, this whitening toothpaste has TWO patented ingredients that no other toothpaste on the market has! These two molecules help remove stains, and help protect the teeth for 24 hours, to prevent more staining. As you keep using the product, it continues to work. Your teeth start to feel smoother and they look whiter.

To purchase within Australia use this link.

For all other purchase enquiries please comment below or email fullcupwellness1@gmail.com

It’s a catastrophe! How to avoid catastrophic thinking

The dreaded anxiety spiral. It’s so difficult to stop it once it begins so the key is to stop it before it gets completely out of hand.

This is going to take a little daily brain training and a lot of mindfulness. Let’s do this!

Mindfulness

Mindfulness means being present and aware in the moment which is a very useful skill for humans to practise. Practising mindfulness encourages us to become more aware of our thoughts and feelings, once we’re more in tune with them it’s easier to have better control of our thoughts.

We all have those moments when our thoughts start spiraling down into very negative territory. The negative thoughts keep getting worse and worse often causing us to feel helpless and full of despair. This is called catastrophic thinking and it usually goes hand in hand with depression and anxiety.

Once we get to that catastrophic level of thinking it can feel impossible to get out of it and back into positive territory. It’s important to identify and re-route our thinking before it gets unmanageable. We can’t control the crappy world around us but we can train ourselves to have control over our thoughts and responses. It’s quite challenging to learn this skill but it’s worth it to feel the freedom that it brings.

The negative thoughts we encounter can feel so real, so true and completely valid. How do you combat that? The answer is to remember that thoughts are not facts. My psychologist taught me this 10 years ago and it has become a mantra in my mind, constantly reminding myself. I even wrote it on my mirror in my bedroom so that I could remind myself constantly, training my brain towards this valuable reminder. You can do it too. Repeat it so that you remind yourself when you need it most.

Thoughts are not facts

This practice of mindfulness can help keep those catastrophic thoughts in check, which will help minimise your anxiety or be a great tool to manage your depression.

Be mindful of your thoughts

Keep an eye on your thoughts and notice how they are affecting you. Is is a great way to train your brain against catastrophic thinking. Practise observing your thoughts without judgement, this is a type of meditation practice.

There are many meditation apps out there that can guide you through a mindfulness meditation session. My favourite meditation app is Insight Timer.

Mindfulness meditation will teach you how to acknowledge your thoughts without placing judgement on them. During your meditation allow yourself to notice feelings without being swept up by them. This will become your regular training so that you can learn to have more control over your actions and your response to negative emotions.

Challenge your thoughts

Being consumed by anxious or negative thoughts is scary because the thoughts feel completely real and rational. If you notice yourself slipping into a spiral take a deep breath and challenge your beliefs. Ask yourself, “Is this threat real right now?” Or is this my brain interpreting this as a dangerous situation?

Focus on the here and the now. Focus on the facts. Thoughts are not facts.

A professional can help

It’s difficult to overcome catastrophic thinking alone, don’t be discouraged! If it’s a challenging task you can ask for help from a therapist. If you don’t already have a psychologist, speak with your regular GP about obtaining a referral to a psychologist that is right for you.

A mental health professional can work through the causes of your catastrophic thinking and recommend the tools and techniques that are suited to your personal situation. 

Never give up. You can learn to remove yourself from the negative spiral of thoughts and combat catastrophic thinking.

Instantly soothe insect bites

Mosquito season is upon us! Did you know only female mosquitoes bite? The males just eat nectar and other plant juices. The female needs to feed on blood for iron and protein to produce eggs.

If you’ve been bitten by a female mosquito looking for nutrients for her eggs, simply apply a dab of lavender oil directly to the bite. The oil stops the itching immediately. It’s my lifesaver during the warm months! I’m quite visible to biting insects so I combat the bites with essential oils. 👍

Order using this link: http://nskn.co/haV5ju

A little goes a long way. One bottle will be plenty for you to enjoy.

There are many ways to enjoy lavender oil.

  • You can massage it into your scalp to promote healthy hair growth.
  • Massage a few drops of lavender and peppermint oil it into your temples when you have a headache for instant relief.
  • Breathe in a whiff of lavender oil before bed to encourage relaxation into sleep.

How do you do lavender?

How do you do breakfast?

I choose not to skip breakfast! Keeping your blood sugar level stable is the easiest way to prevent type 2 diabetes (which runs in my family) and keep brain function at optimal levels. 

Did you know that your brain can’t function without glucose? That’s why when you’re hungry your body tells you to have high energy foods. It’s a defence mechanism, a quick band aid solution to your lack of energy. What your body is actually asking for is complex carbohydrates (Low GI foods) that can be broken down and digested into glucose molecules for the brain to use as energy.

Low GI foods such as brown rice, brown bread and grains are the best option for a hungry brain. They keep your blood sugar stable too!

I also reach for some protein in the morning to give my muscles the energy to tackle the day. Protein helps your body feel fuller for longer! The reason your body needs protein is because proteins are made up of amino acids, the building blocks of life. Your muscles, enzymes, cells, everything in your body needs that precious protein.

How do you do breakfast in the morning?

Source: https://www.finedininglovers.com/blog/food-drinks/international-breakfasts/